
Have you ever saw a CPA video that actually looked legit? So legit to where you started questioning yourself, “does this actually work?”
Chances are, you probably saw a video that showed coins, gems, or points generating. These, my friends, are called fake proof CPA videos.
Knowing how to make these videos is really great because they increase your conversion rate. And, we all know, when conversion rates get higher, you earn more money.
So, you might be wondering, “Trent, how do I make a fake proof CPA video?” And I’m here to tell you, all you need are a few things: a niche, Adobe After Effects, Adobe Photoshop, some files, and the ability to follow directions.
I’m going to show you how to:
- gather assets (video, screenshot, and fonts) we need to get started
- create an overlay
- produce the video to generate fake proof
- export the video so you can start getting conversions
Gathering the Assets
Now, you might know this, but we can’t create a fake proof CPA video without some files.
With this being said, we’re going to be capturing the video. Then, we will screenshot the application’s interface so we can create an overlay of it.
Finally, we’re going to be finding the exact font you need for your video to look legit. Let’s get started!
Capturing the Video
Now, I’m sure there are a ton of different video recorder apps for your phone, but my favorite one is XRecorder.
All you need to do is download XRecorder, run the app and give it permissions to record on your device.
Note:
I realize that XRecorder is only for Android devices. I don’t have an IPhone, but you could try “Screen Recorder” on the from the Apple App Store.
When you exit to your home screen, you should see an orange circle with a video camera icon on the edge. If you click that, you can then click the red record button and begin recording.
Once you are recording, you are going to want to open up your desired app. In my case, it’s going to be “Clash Royale”.
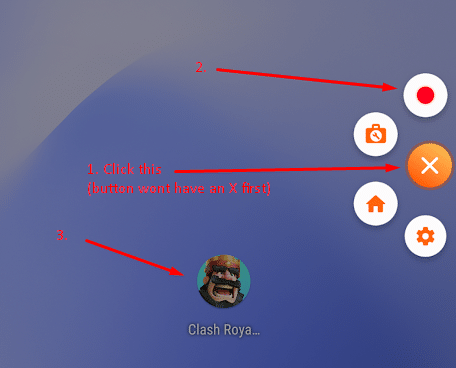
Once you’ve opened up the app, you want to make sure you show the currency you are wanting to generate fake proof for. Record this for about another 20 seconds.
When you’re done recording, press the orange icon on the edge again and then press stop.
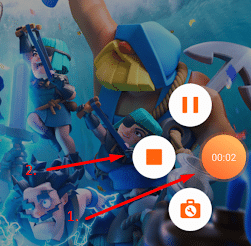
Your video should now be created and all you need to do is just download the video to your computer. Here is an example of the footage I captured for my fake proof CPA video.
Creating the Screenshot
Now it’s time to grab a screenshot of the application so we can use this to create our overlay for our video. To do this, simply load your game again and grab a screenshot of where it shows the currency you’re trying to generate fake proof for. This is what I came up with.

Finding & Installing the Font
I can’t really stress enough how important it is to get the exact font your app of choice is using. This is because if you want to make your video look legit, you need to match the font! For this part of the section, I’m going to show you how to grab the font you need from APK packages.
Note:
There are always going to be other creative ways to get the font. So, if you know how to do this or have your font already, then you can skip this step.
I’m not going to completely go into how APK packages work. But, just know the font you’re looking for is most likely in an apk file somewhere. Let me show you what I mean!
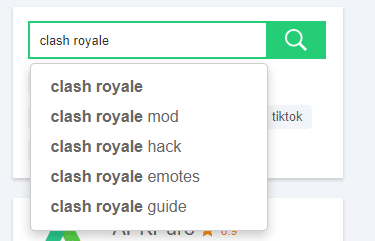
First, go to apkpure and search for the application you’re generating fake proof for.
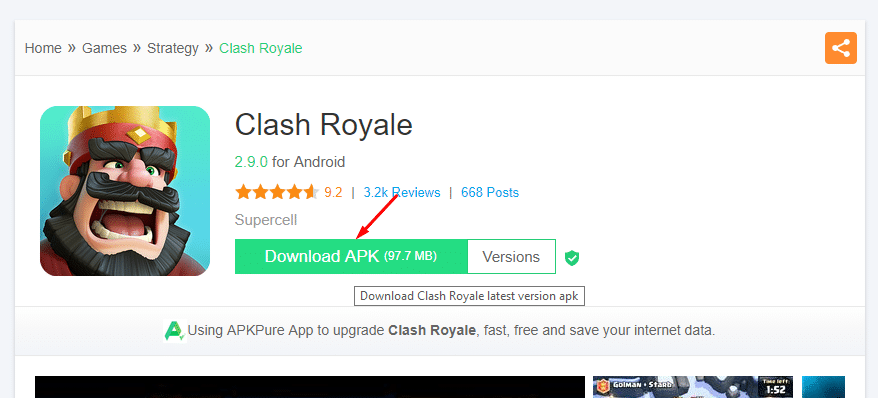
Then, click “Read More” on the result you are looking for.

Press “Download APK”.
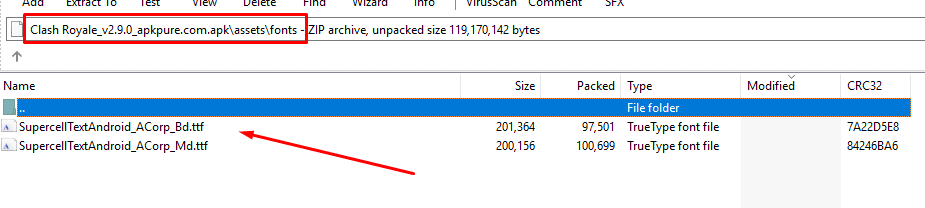
Now we need to open the .apk with WinRAR. To do this, make sure you have WinRAR installed and open it. Then, drag the .apk file into the WinRAR window.

Locate the assets/fonts folder and your font file should be there.
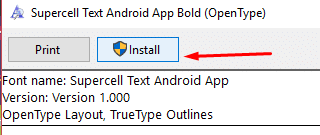
Now all you need to do is just install the font!
Creating the Overlay
Cool, we’re now ready to create an overlay of the game’s interface. We need to do this because the overlay will be covering the actual interface with the gems in the fake proof CPA video.
To get started, we need to open up Photoshop. Once you have photoshop opened, you’re going to import your current screenshot. To do that, go to “file” > “open”. Then select your screenshot which you’ve created earlier.
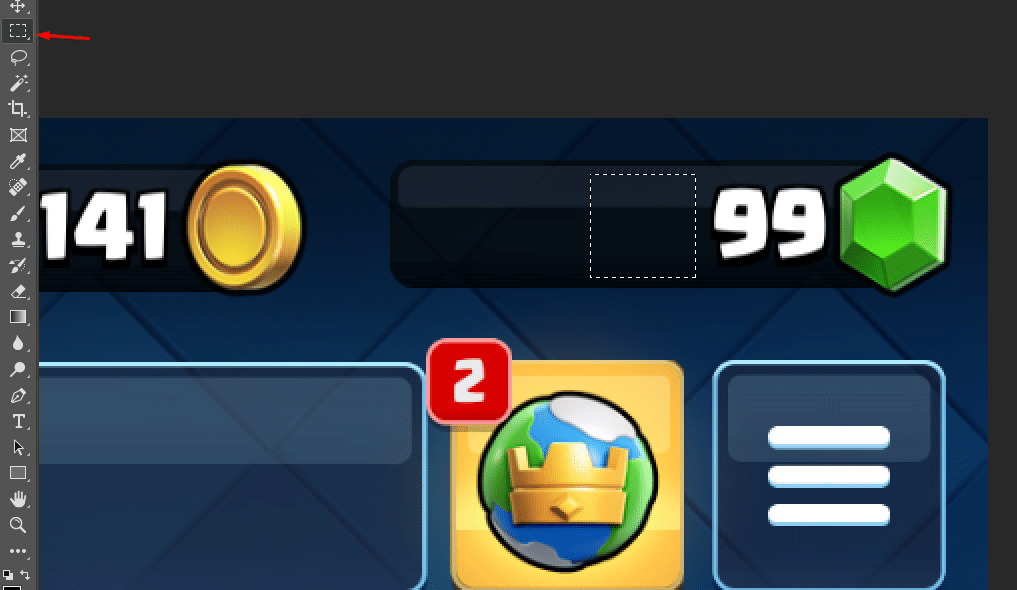
Next, you’re going to want to zoom in by pressing the magnifying glass icon to the left in your sidebar. Make sure that you can just mostly see the currency like this.

Press the selection tool on the left in your sidebar and select a piece of the background.
Press ctrl + j and it will duplicate a layer. Once you see a new layer created in your layers panel, you will press shift + right. Repeat this process until you cover all of the numbers.

Now we want to merge all layers into one. This is so we can make a selection and duplicate it as one layer, instead of three (or how ever many layers you have). To do this, select all of the layers, right-click and press “Merge Layers”.
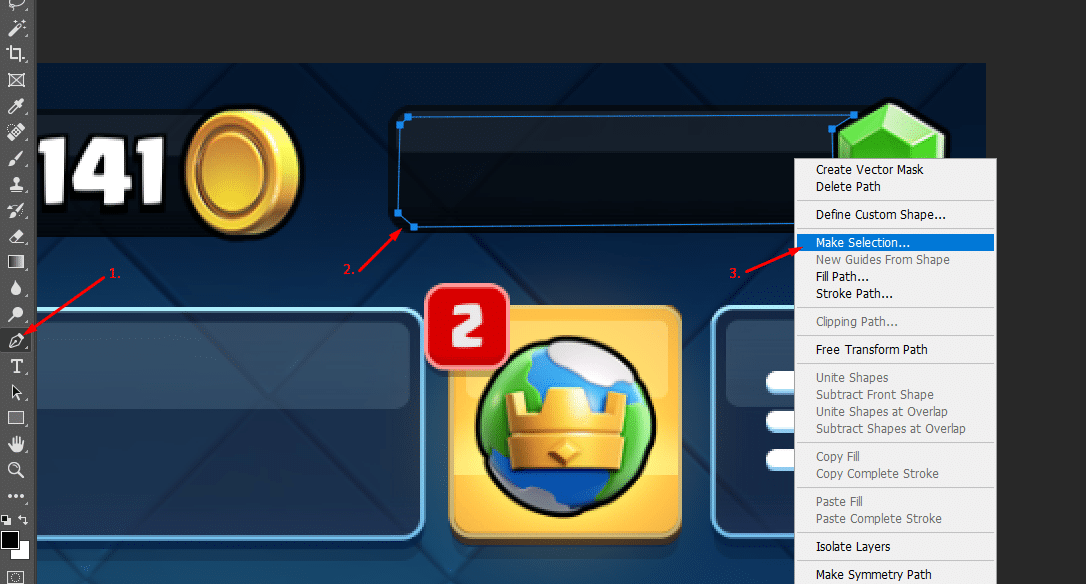
Cool! Now we are ready to make our overlay. Simply click the pen tool on the right toolbar and make a selection.
Note:
The pen tool can be a bit tricky to use. Make sure you click the corners of the interface and connect all the dots.
Right-click inside your selected path and press “Make Selection”. Click ok on the other prompts.
Now all you need to do is press ctrl + j to duplicate this selection. Your screen should look something like this. If it doesn’t you may have done something wrong and you should retry.
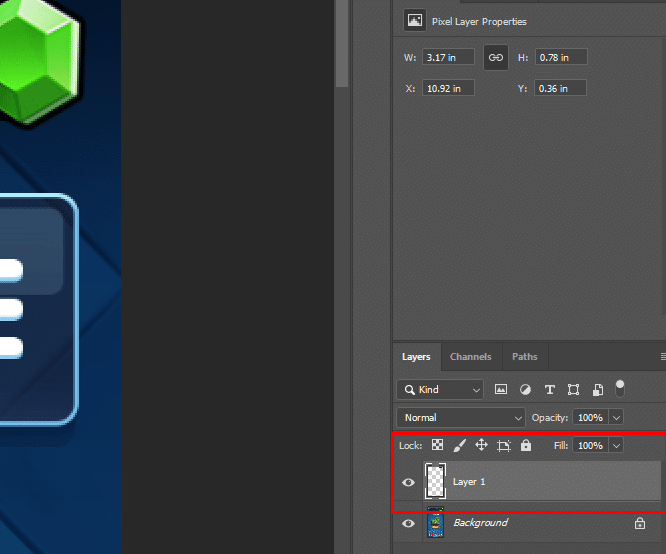
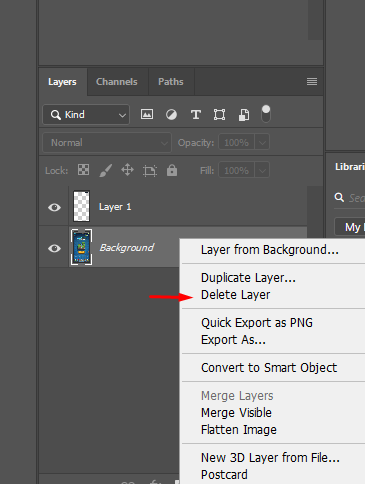
Next, we need to delete the background layer. To do this you need to right-click the bottom layer and then click “Delete Layer”. Press ok on the next prompt.
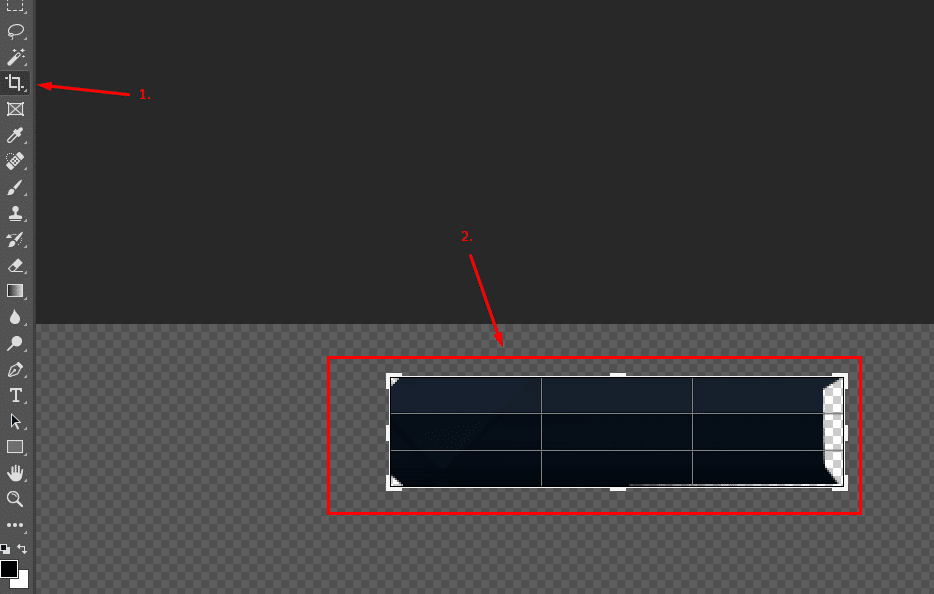
Cool, now we should just have our overlay. You’ll notice that the overlay is just a fraction of the size of the canvas. So we need to crop our picture!
All you need to do is press the crop tool on the left sidebar, select just your overlay, and press enter.
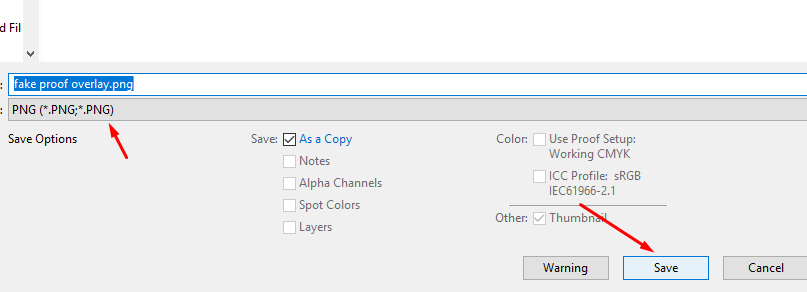
Lastly, we’re going to save this as a .png with a transparent background. Click “File” > “Save As” and save it as a .png. Press okay on the next prompts you see.
Awesome! Now we are ready to manipulate our video footage we captured earlier.
Producing the Video
Now we are going to cover the old interface in the video we’ve captured with our new overlay. This will ultimately create the effect of no numbers being on our selected interface. Lastly, we’re going to put our own custom numbers on the top of our overlay and add an effect to create our fake proof CPA video.
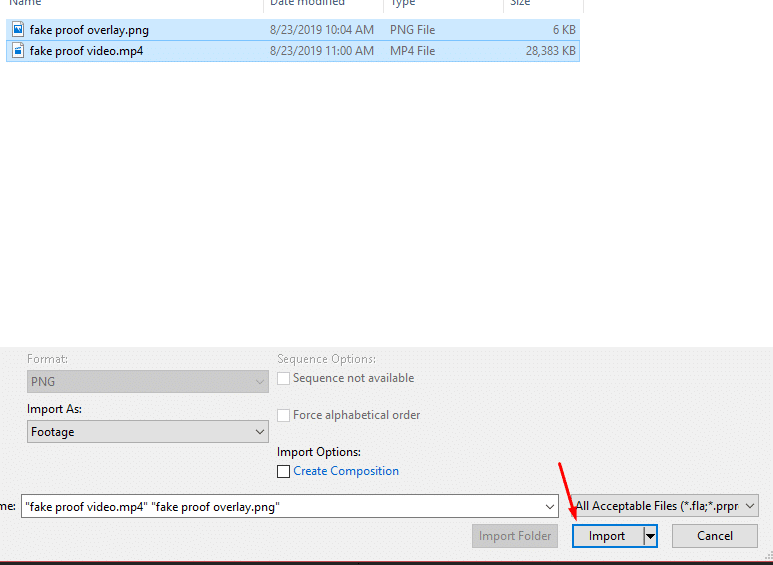
To do this, we’re going to open up Adobe After Effects. Then we’re going to import our overlay and video by pressing “File” > “Import” > “File” and selecting our files from earlier. Press “Import”
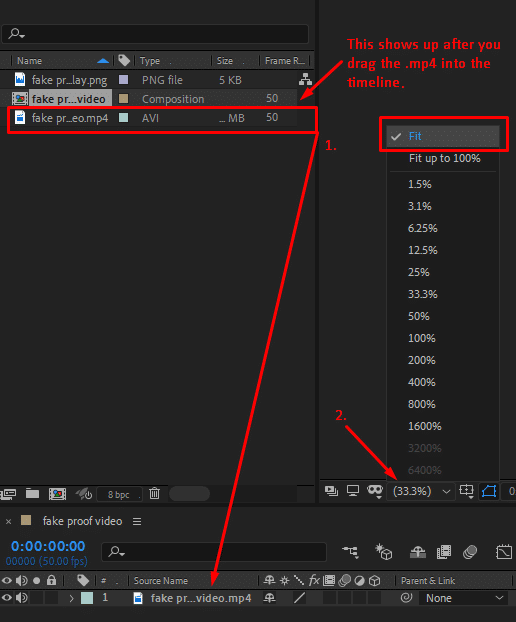
Now it’s time to drag the video file into the timeline panel. Once this is done, make sure to set your zoom to “Fit”. Your screen should look like this.
Perfect. Now we are ready to drop our overlay image on top of the video file. To do this, drag the blue ticker to the first point of where your interface shows. Then, drag the overlay to the blue ticker’s location.

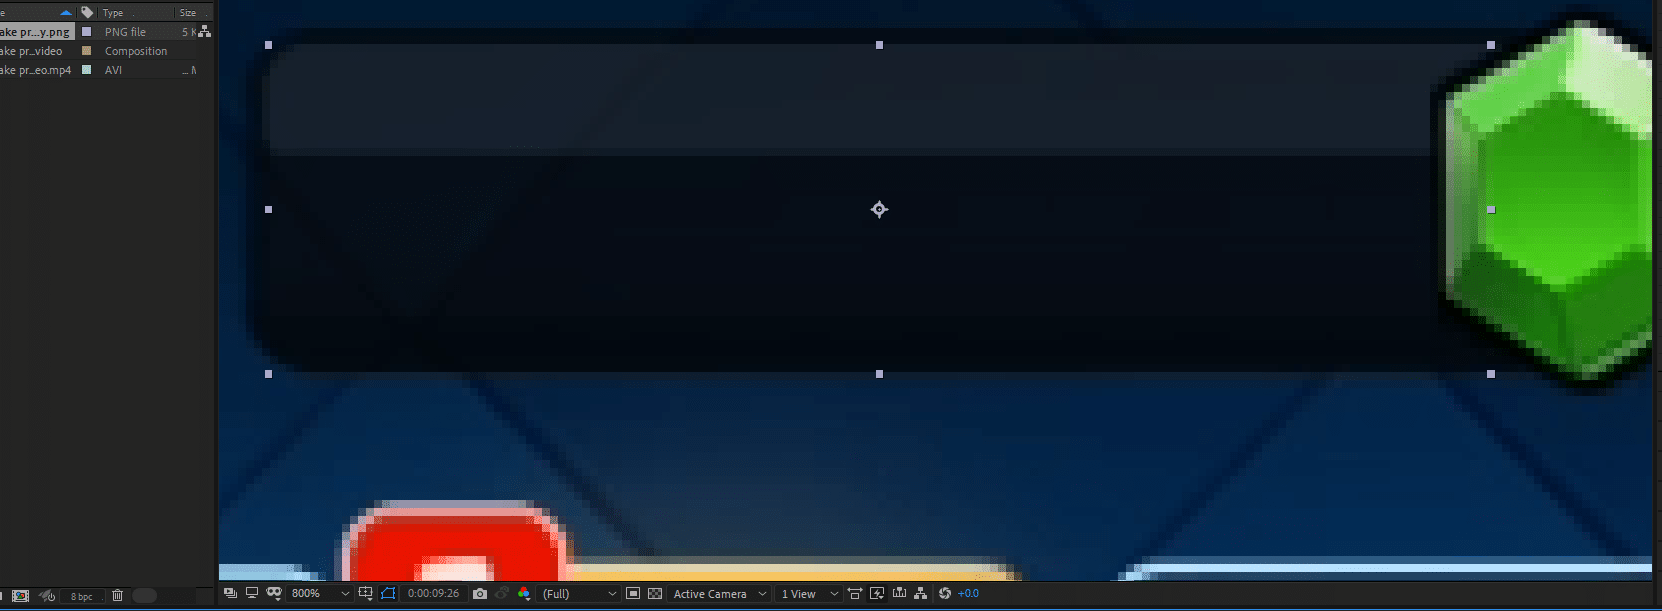
Let’s now position the overlay file on top of the actual interface. First off we need to adjust our zoom level to where the overlay is taking up most of the screen.
Now just drag the overlay to the place where your interface you copied earlier is positioned. Then, align the overlay to be on top of the interface.
Note:
Feel free to also adjust the zoom level to a higher percentage. However, if you do this and can’t see your overlay to adjust, you will need to reposition your screen to the overlay by using the hand tool on the top toolbar.
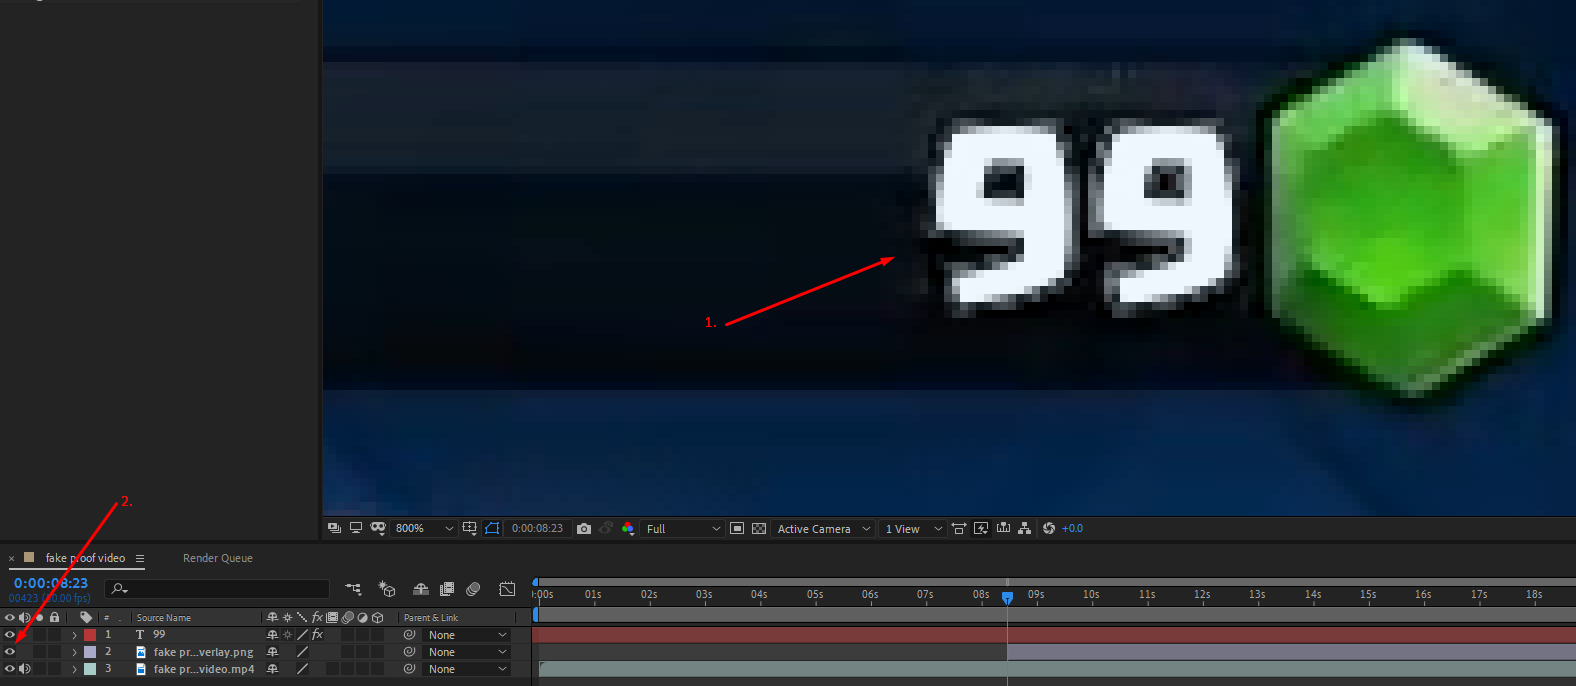
Now, go back to the top toolbar and click the “T” icon. This should open up the text tool. Click ontop of the interface and type in the exact number that was showing before. For me, my number is 99.
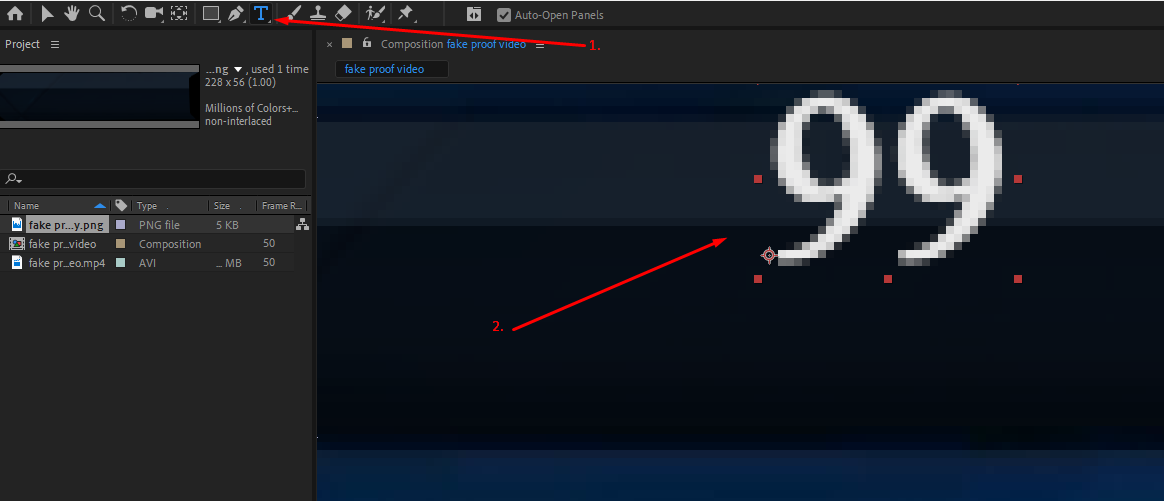
Let’s stylize our number to match what was shown in our interface. First, go down to the timeline panel and click the eye on the overlay file. This should make your overlay file invisible and now you should see two numbers so we can align our text with what is shown on the interface!
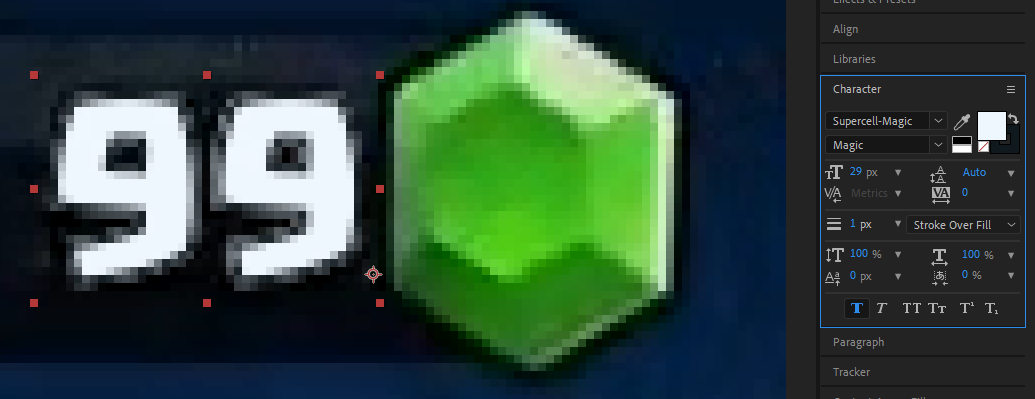
Go to the “Character” navigation menu to modify your text to look identical to the text shown on the interface. You will, of course, need to select your matching font and modify the stylizations. For me, my font is Supercell-Magic, the size is 29px, and I added a stroke.
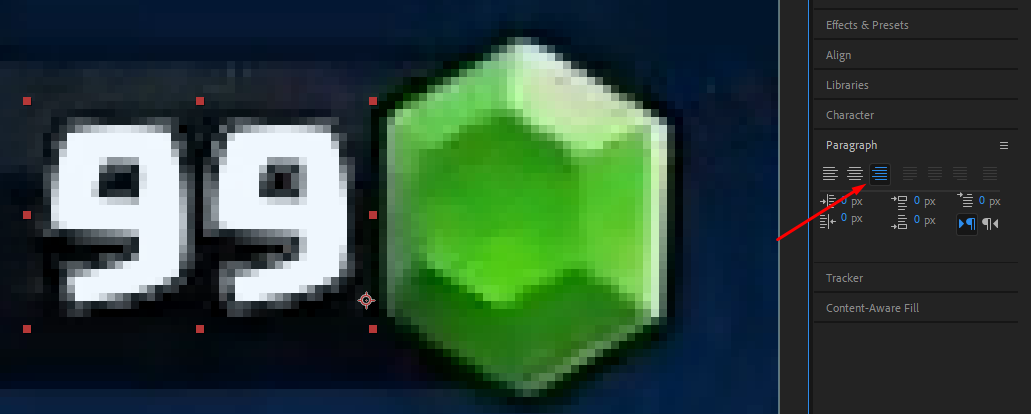
Now let’s click the “Paragraph” navigation menu. We’re going to select the proper alignment for our numbers. In my particular niche, the numbers are supposed to generate from right to left. By default, it is left to right. So, make sure that your numbers generate the way the game does it.
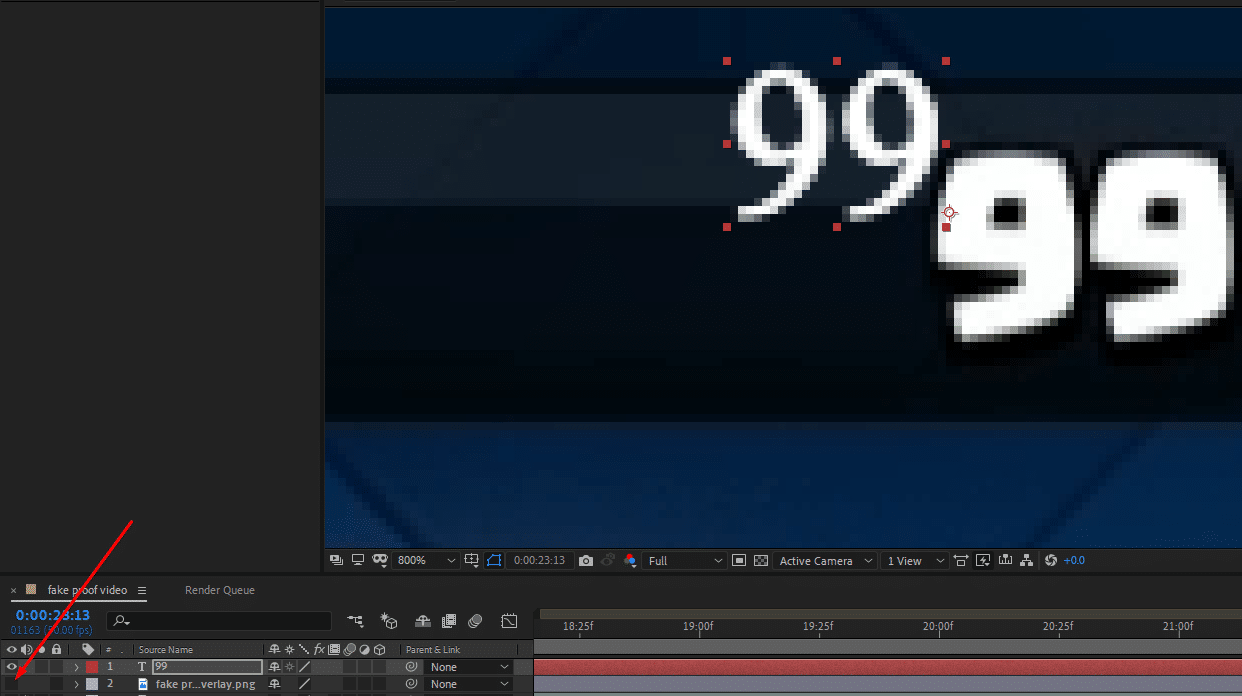
Then, you need to simply align your text to be on top of the video interface layer. Lastly, go back to your overlay layer in the timeline panel and click the empty box which had an eye icon before.
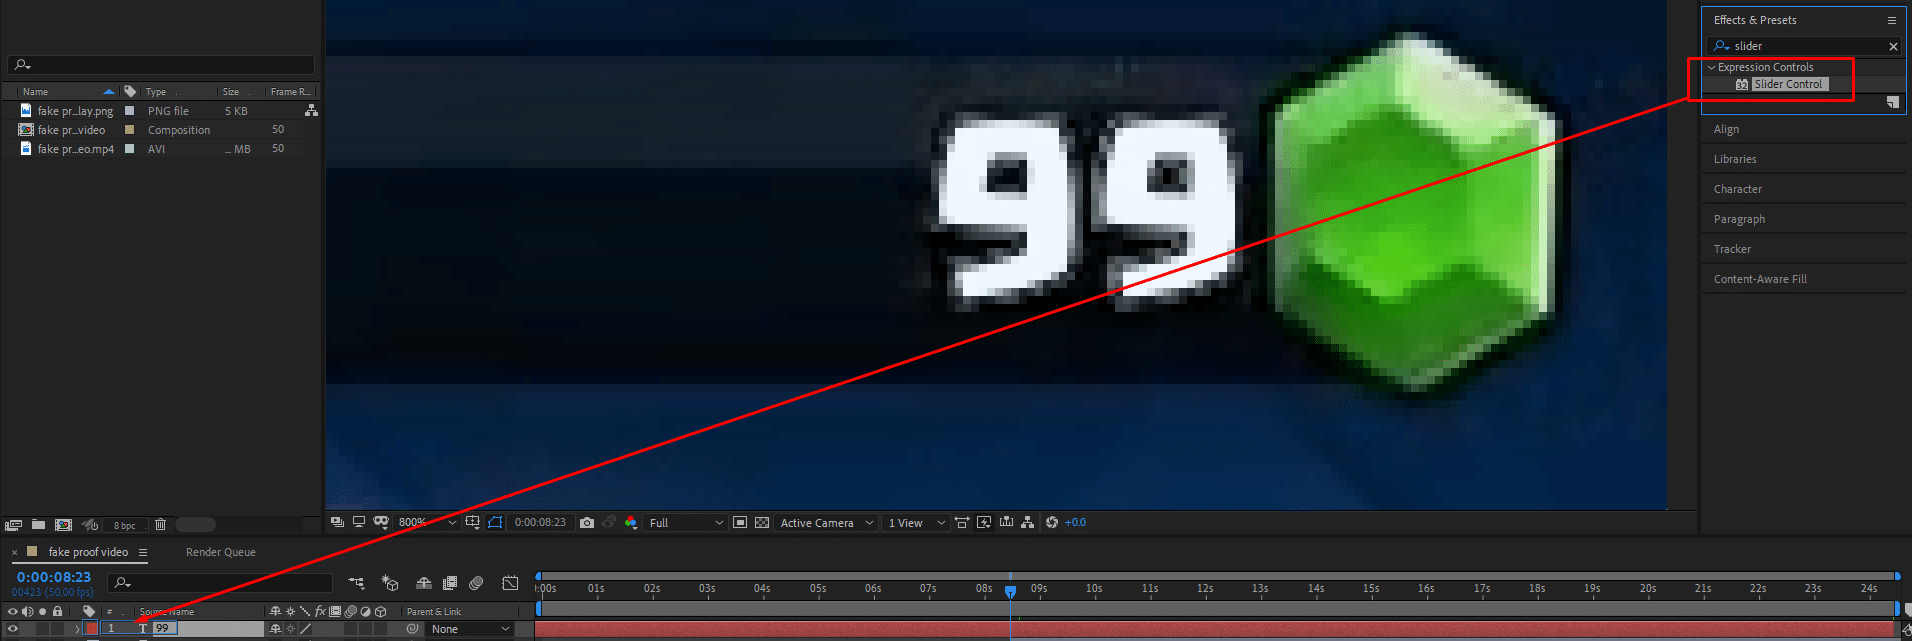
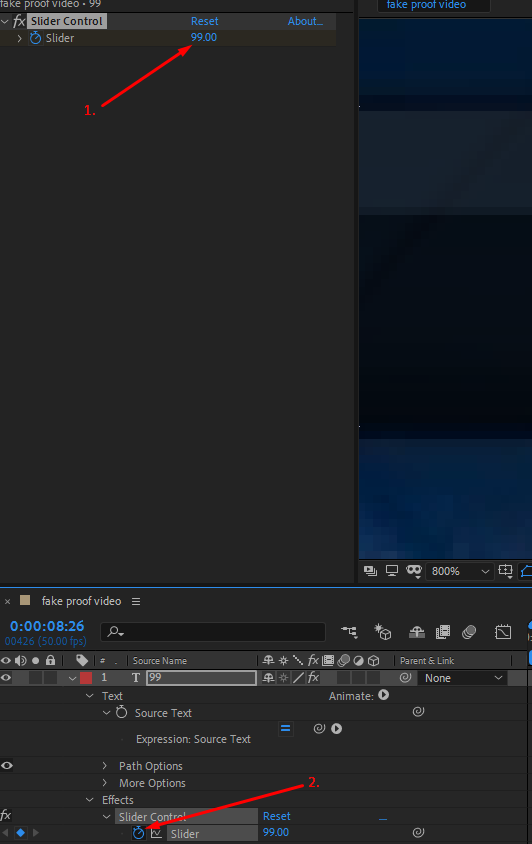
Click on the “Effects & Presets” navigation menu and search “slider”. Then, drag the slider control effect on the text layer.
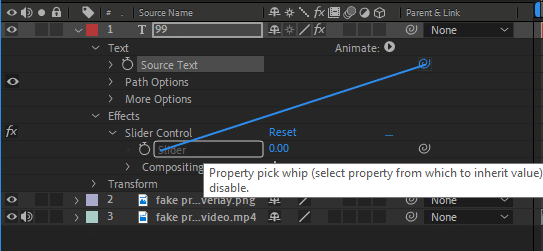
Expand the settings for the top text layer. Then, proceed to expand the settings for the “Text” and “Effects” options. Lastly, expand the “Slider Control” Options.
Sweet, we’re getting closer. Now we just need to link the source text to the slider by clicking, holding, and dragging the lasso icon to the slider option.
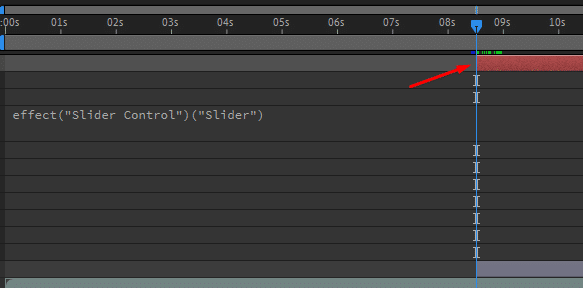
Expand the source text option and you should see effect("Slider Control")("Slider") in the timeline.
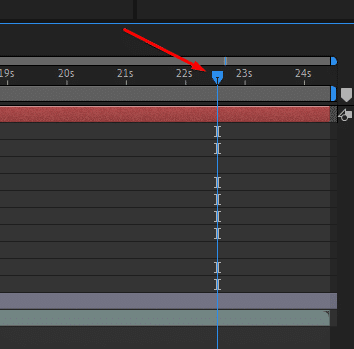
Now we’re going to adjust our text layer to start only when the overlay shows. This is so we don’t have our text showing in our fake proof CPA video when the interface isn’t showing.
Now go to the “Slider Control” panel and set your number back to the one you previously configured it to. Then, click the timer icon under the “slider” option under “Slider Control”
Drag the blue ticker just a couple of seconds before your video ends.
Go to the “slider” option under “slider control” and change it to whatever value you want it to generate to and press enter.
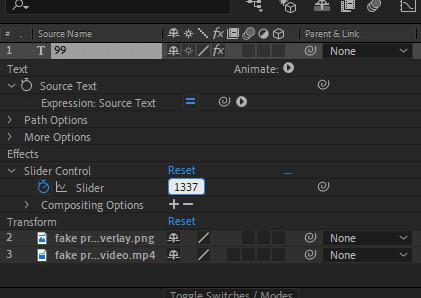
The last step is just to remove all those weird decimals. All you need to do is click into the source text and change it to Math.round(effect("Slider Control")("Slider"))

Congratulations, you’re now done producing your fake proof CPA video! There’s only one more step and that’s exporting the whole project as a file.
Exporting the Video
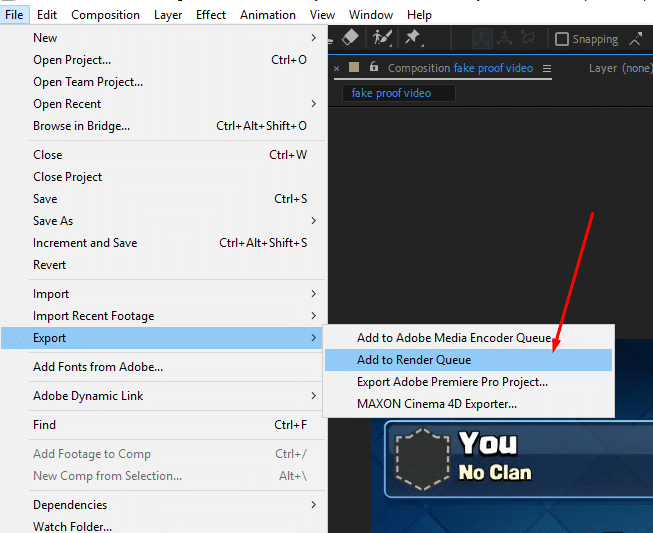
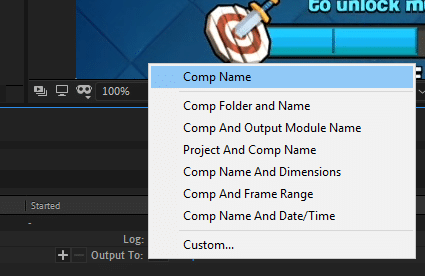
To finally export the fake proof CPA video project into a file, follow these directions. First, go to “File” > “Export” > “Add to Render Queue”
Click “Not Yet Specified”, which is right of “Output To”. Then select the path and name your video.
Here is what my fake proof CPA video looks like:
Alright, give yourself a pat on the back, the video is done! All you need to do now is just upload it to Youtube and start collecting leads!


amazing post; how can I be your referral on cpabuild
Hey Anis, thanks for your feedback! To be under me for CPABuild, go to https://wealthyhustler.com/recommends/cpabuild
I have already an account how can i add you
I would suggest contacting your affiliate manager about this matter
Great post thank you
I have a question, how can we find a content locker landing page for the game we wanna promote ?
hi Abdullah contact me on skype: @Gilgamesh@ I can help you
Thank you for this post. Can you give some tips on how to not get your videos instantly deleted on youtube? Thanks
I face the same problem
Make your on video as Trent shown you guys and you’re good.
This has been noted.
I will see what I can do.
Thnks for the post man, but i got lost in the After effect section, must it be after effect? i’m finding after effect difficult.
Hey Joseph, I might need to touch up the article a little bit more then! I am posting a video tutorial over how to generate fake proof soon!
Thank you so much for this article. I’m all good with the creation of the video but it is having 8GB for a 1 minute video after exporting. How can I reduce it to below 100 MB in size?
It’s only for rendering, once After Effects is done rendering you get your mp4 video with around 150 MB for each 4 minutes.
How do they make when they are filming phone? It is similar?
Wow this is great information! Thanks
Dear Trent,
This is what i was looking for. Cheers mate. Why dont you update this website.
Just sent a request to my affililate manager in cpabuild to make my referral under you.
I sent you request via messanger to you page. but the BOT give me a hard time there.
pls contact me ASAP as i hve some questions.
Just let me know does this methods still work and can earn decent money with in 2021 ? as youtube algo have now been changed.
tks mate.
Rav
Hello there, thank you fot tuto but the lassoc icon dont show in source text, so I can’t hold and drag it on the top of slider, any soltions for this problem…